


Who doesn’t love a dessert that’s both creamy and crunchy, sweet and indulgent? No-Bake Twix Cheesecake combines all these elements into one irresistible treat. With its creamy cheesecake filling, crunchy crust, and decadent Twix candy topping, this dessert is a crowd-pleaser. Plus, it’s super easy to make because it doesn’t require baking!
If you’re looking for a delicious dessert that’s perfect for any occasion—whether it’s a holiday, a birthday, or just a treat to enjoy on a regular day—this no-bake Twix cheesecake is the way to go. Let’s dive into how you can make this yummy dessert step by step.
Why You’ll Love No-Bake Twix Cheesecake
Before we get into the recipe, let’s talk about why this cheesecake is so fantastic:
- No Baking Required: Unlike traditional cheesecakes, this one doesn’t need to go in the oven, which makes it quicker and easier to prepare.
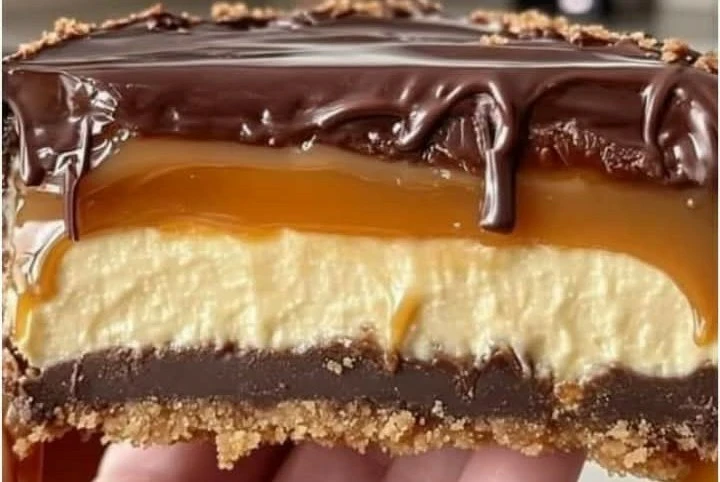
- Perfect Balance of Flavors: The creamy cheesecake filling pairs perfectly with the crunch of Twix candy and a buttery, crumbly crust.
- Customizable: You can easily adjust this recipe to suit your taste—add more Twix for extra crunch, or switch up the crust to your liking.
- Ideal for Special Occasions: Whether you’re hosting a party or simply treating yourself, this dessert is sure to impress everyone who tries it.
Now that you know why this cheesecake is so irresistible, let’s jump into the ingredients you’ll need.
Ingredients You’ll Need
For this no-bake Twix cheesecake, you’ll need the following ingredients:
For the Crust:
- 1 1/2 cups crushed graham crackers (you can also use digestive biscuits or shortbread cookies)
- 1/4 cup granulated sugar
- 1/2 cup unsalted butter (melted)
For the Cheesecake Filling:
- 16 oz cream cheese (softened to room temperature)
- 1/2 cup powdered sugar
- 1 cup heavy whipping cream
- 1 tsp vanilla extract
- 1/4 cup caramel sauce (for that caramel flavor that’s signature to Twix)
For the topping:
- 6-8 Twix bars (chopped into small pieces)
- 1/4 cup caramel sauce (for drizzling on top)
- 1/4 cup chocolate sauce (for drizzling on top)
Step-by-Step Instructions to Make No-Bake Twix Cheesecake
Making this cheesecake is simple and straightforward. You’ll need about 30 minutes of prep time (not including the chilling time), and then you can sit back and enjoy the delicious results. Let’s go step-by-step.
Step 1: Prepare the Crust
The crust is the base of your cheesecake, and it’s what gives it that satisfying crunch. Here’s how you make it:
- In a medium bowl, combine the crushed graham crackers (or your choice of cookies) and the granulated sugar.
- Add the melted butter to the mixture and stir until everything is well combined. The mixture should be moist and crumbly.
- Press the mixture into the bottom of a 9-inch springform pan or a pie dish. Make sure to press it down firmly with the back of a spoon or your fingers to create an even crust.
- Once the crust is in place, put the pan in the fridge to chill for at least 15-20 minutes while you prepare the cheesecake filling. This will help the crust set and firm up.
Step 2: Make the Cheesecake Filling
The filling is where all the magic happens. It’s creamy, fluffy, and sweet, and it pairs perfectly with the crunchy crust and Twix topping. Here’s how to make it:
- In a large mixing bowl, beat the softened cream cheese with an electric mixer on medium speed until it’s smooth and creamy. This usually takes about 2 minutes.
- Gradually add the powdered sugar and vanilla extract to the cream cheese, continuing to beat until everything is well combined.
- In a separate bowl, beat the heavy whipping cream with an electric mixer on high speed until stiff peaks form. This means the cream should hold its shape when you lift the mixer.
- Gently fold the whipped cream into the cream cheese mixture using a spatula. Be careful not to deflate the whipped cream—fold until it’s well combined and fluffy.
- Once the filling is smooth, stir in the 1/4 cup of caramel sauce. This will add that delicious caramel flavor that makes the cheesecake even more decadent.
Step 3: Assemble the Cheesecake
Now that your crust and filling are ready, it’s time to assemble your cheesecake.
- Take the chilled crust out of the fridge. Pour the cheesecake filling on top of the crust, spreading it evenly with a spatula.
- Smooth the top of the cheesecake and make sure it’s level.
- Put the cheesecake back in the fridge to chill for at least 4 hours, or preferably overnight. This allows the filling to set properly and gives the flavors time to meld together.
Step 4: Add the Topping
Once your cheesecake has chilled and is set, it’s time to add the best part—the topping!
- Chop the Twix bars into small pieces. You want to have bite-sized chunks that will give you that perfect mix of chewy caramel, crunchy cookie, and smooth chocolate.
- Sprinkle the chopped Twix pieces evenly over the top of the cheesecake. Make sure to cover the surface well so every bite has some Twix in it.
- Drizzle the caramel sauce and chocolate sauce over the Twix-covered cheesecake. You can either drizzle them in a decorative pattern or just pour them on however you like.
Step 5: Serve and Enjoy!
Your no-bake Twix cheesecake is now ready to be served! Once you’ve added the topping, you can either serve it immediately or let it chill for a bit longer if you prefer a firmer texture.
To serve, carefully slice the cheesecake into wedges and enjoy the creamy, crunchy, caramel-filled goodness.
Tips for Perfect No-Bake Twix Cheesecake
To ensure your no-bake Twix cheesecake comes out perfectly every time, here are some helpful tips:
- Use Softened Cream Cheese: Make sure your cream cheese is softened to room temperature before mixing. Cold cream cheese can result in lumps in your filling.
- Whip the Cream Well: When whipping the heavy cream, be sure to beat it until stiff peaks form. This gives the cheesecake filling its light and fluffy texture.
- Chill for Best Results: Don’t skip the chilling time! The cheesecake needs to chill for several hours to firm up and allow the flavors to develop. If possible, let it chill overnight for the best texture.
- Customize the Topping: Feel free to add extra toppings if you like—chopped nuts, extra caramel, or even a drizzle of melted white chocolate would all make delicious additions.
- Use a springform pan: A springform pan makes it easier to remove the cheesecake without ruining its shape. If you don’t have one, you can use a regular pie dish, but the cheesecake may be a little harder to slice neatly.
Why You’ll Love No-Bake Twix Cheesecake
There are so many reasons why this No-Bake Twix Cheesecake is going to become one of your favorite desserts:
- No Baking: This is a huge plus if you don’t want to turn on the oven, especially during the warmer months.
- Easy to Make: The recipe is simple, and with only a few steps, you can create a beautiful dessert that looks like you spent hours on it.
- Rich and Decadent: The combination of creamy cheesecake, crunchy Twix candy, and caramel and chocolate drizzles is truly indulgent.
- Perfect for Parties: This cheesecake is great for parties, potlucks, or family gatherings. Everyone will love the familiar taste of Twix in cheesecake form!
Conclusion
No-Bake Twix Cheesecake is an incredibly easy and delicious dessert that combines the creamy richness of cheesecake with the irresistible crunch of Twix candy. With its simple ingredients, easy prep steps, and decadent flavors, it’s the perfect treat for any occasion. Whether you’re making it for a special event or just because you deserve a sweet indulgence, this cheesecake will definitely satisfy your sweet tooth.
So, go ahead and try making this no-bake Twix cheesecake today. It’s guaranteed to become a family favorite!